
|
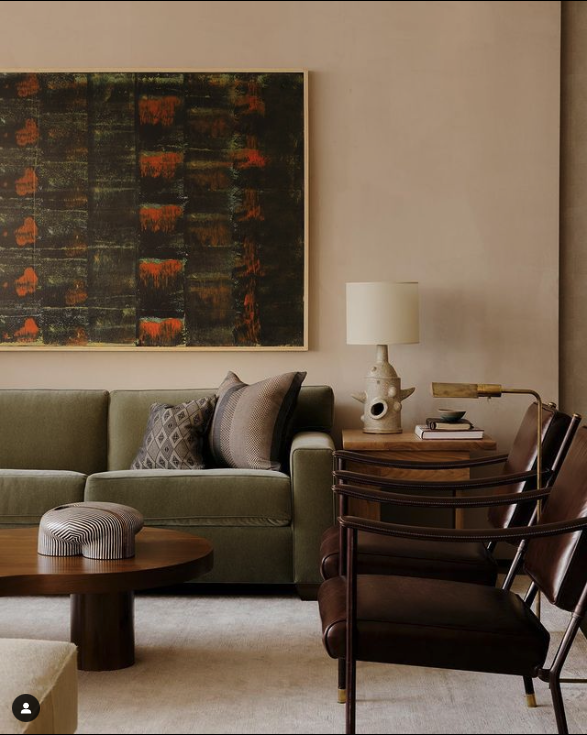
Products that we love and trust from Pottery Barn—straight from the source. Written by Lindsay Webster  Photos of my little ones in their favorite cuddle spot. From left to right, Cowboy 4 months, daughter 4 yrs, Barley 13 yrs. I know what you're thinking: "How do you have an oatmeal colored sofa that is still oatmeal and not covered in mud and sticky hands?" Find out how below. If you’re looking for a great retail brand that offers an array of products to style your home, you’ve come to the right place! We love sharing our professional opinion on great products we can stand behind (because as we know you can't trust everything you see online). Who better than myself to share my PB knowledge, as I am a former Pottery Barn Designer and Manager. Here are some of my favorite Pottery Barn furniture and accessory pieces to spruce up your family's favorite spaces. #1. Carmel Wide Arm Chaise Sectional (Click the photos to go directly to the product!)  Carmel Wide Arm Chaise Sectional This clean-lined collection is totally customizable which makes it perfect in every way, giving you the option to choose from upholstered, slipcovered or even leather. It’s available in 3 different arm styles which include slim arm, wide arm, and recessed arm. This collection offers several configurations to choose from, but you can also choose the Build Your Own option to customize it for your space. We recommend visiting your local Pottery Barn to test out the comfort and feel, and this is also a great time to see all the fabric and leather options in person. If you do not have a store nearby, have no fear, Pottery Barn will send free fabric swatches directly to your home. In addition to the free swatches, a great way to get more information is by calling your nearest store and speaking with a designer about the products you’re interested in. You can also check their website for all the specifications. Got pets? They’ve got you covered— literally. In addition to pet friendly fabric, Pottery Barn offers a Pet Furniture Throw in 3 different sizes and in whatever fabric you have chosen for your sofa. If there are any accidents down the road, don’t worry. As long as the fabric is still in stock, you can replace covers and cushion inserts as needed. By checking your order history, a Pottery Barn sales associate can check availability and help you place your order. I have this sofa in my home and couldn't be happier with it! It has been indestructible even with my 4-year-old and two dogs climbing all over it. On a muddy day I can take off all the covers and machine wash them on cold. I personally like to hang my light fabrics outside on a sunny day to use the sun as a natural stain remover. It works wonders!  #2. Ayden Barrel Leather Swivel Chair  Ayden Barrel Leather Swivel Chair Who doesn’t love a good leather chair? Well, we're obsessed with the Ayden Barrel Swivel. This minimal but comfortable chair is a perfect statement piece that offers beauty and function. We look for opportunities to ground spaces with warm leather pieces, and with a 360-degree turn, this chair is suitable for almost any location. We envision this chair in many places, from the living room to the bedroom, or maybe even a nice quiet reading nook. No matter where you put the Ayden Barrel, you won’t regret it. This chair is made to order, which means you can customize it to your liking. You choose from a variety of leathers and colors, and you have the option of either the 32” or 40” Grand version–creating the perfect combination that fits your needs and style. Because leather is a natural product, both texture and color will vary slightly from hide to hide. Top-grain, aniline-dyed leather will lighten and soften with age and wear making this product timeless. Pottery Barn offers leather products designed to revive and extend the lifetime of your furniture. Check out their Mohawk Leather products on their website for more information. Like the sofa above, this item is White Glove Delivery which is a wonderful service that makes this purchase pain free when installing. Pottery Barn will schedule delivery once the item has been receieved and will assemble everything for you. They do not take any existing furniture so you will want to have a plan for any old furniture before they arrive. #3. Faye Linen Textured Pillow Covers  Faye Linen Textured Pillow Covers Let’s talk pillow covers. The Faye Linen Textured Pillow Cover is one of my favorites. Made up of 100% linen on the front and a 52% linen and 48% cotton blend on the back, this pillow cover adds texture, color and warmth to any room. This item is available in 15 color choices and also comes in a striped version available as the Faye Textured Stripe Pillow Cover that has a few color options as well. Faye covers are a great option if you want to mix different pillow patterns, sizes, and shapes to elevate your space. Get inspired and add a pop of color to your bed, sofa, or chairs. #4. Colossal Ribbed Handknit Throw Blanket  Colossal Ribbed Handknit Throw Blanket It may be spring but there is always a need for the perfect throw blanket. I love the soft and cozy, Colossal Ribbed Handknit Throw Blanket for many reasons. This is a great way to add layers and texture to your space that also offers function. I like to call this “living décor” because it is beautiful but will keep you warm on cooler days. Made from 100% acrylic, yarn-dyed fiber has an incredibly rich color that holds its vibrancy over time and the bonus—it has been tested for 1000+ harmful substances. This thoughtfully handcrafted piece can be a staple accessory in any room. #5. Artisan Handcrafted Terracotta Vases  Artisan Handcrafted Terracotta Vase We love pottery at SBD, and I think we can all agree handcrafted accessories are a no brainer if you're looking to add a unique touch. These Artisan Handcrafted Terracotta Vases from Pottery Barn will help you create a wow factor with an organic feel. Style yours with fresh flowers, faux flowers or just let the vase speak for itself. Either way you will have an elegant and timeless piece of art. We hope you found your favorite Pottery Barn product while reading through. If you aren't able to visit a retail store, shopping online may seem like climbing a mountain, but doing a little bit of research and then calling a store can make it easier to make a decision. A personal favorite hack of mine is looking at customer photos online to get an idea of the actual color, size and texture of the products you're interested in. When all else fails, hire your favorite designer to do all the heavy lifting. Comment on your favorite item below, even if it's something else you've purchased from Pottery Barn, and love. If you or anyone you know is struggling with finding time or energy to design your favorite spaces, Sonia Barney Design is only a button away! Personal photo credit- Lindsay Webster |
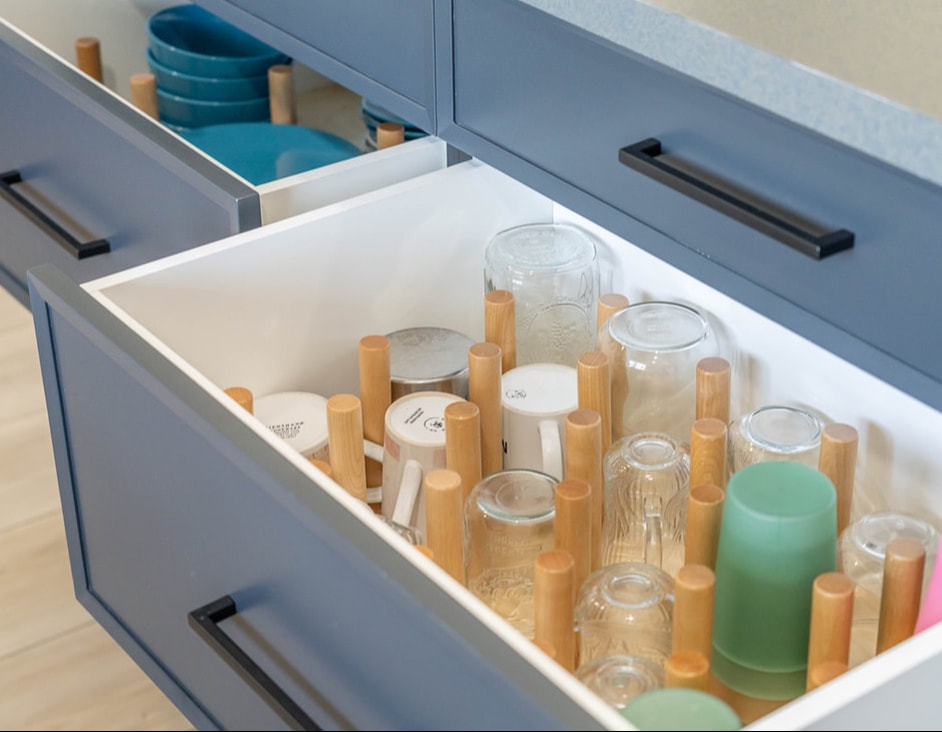 | Peg storage inside of drawers is a fantastic way to organize your dishes. The best part about it is the flexibility to rearrange the layout as your needs change over time. It can be utilized for a variety of items such as dinnerware, drinking glasses or heavy dishes. And our favorite reason to add these is that your kids can safely put dishes away. Can I get, booya?! |
2. Pull-Out Trash Cans
| A pull-out trash is a must-have kitchen cabinet. Not only is your trash hidden away while not in use, but it also makes brushing crumbs directly into it from the counter a breeze. The one in the photo to the right shows a drawer above it that is perfect for storing additional trash bags. We suggest placing this setup near your sink or prep area. | 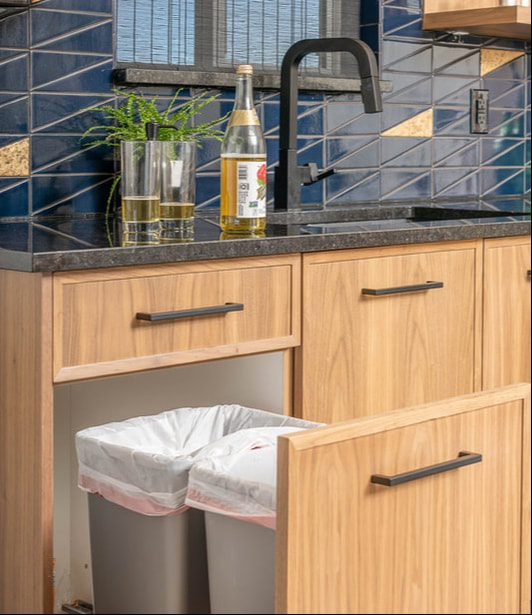 |
3. Drawer Dividers
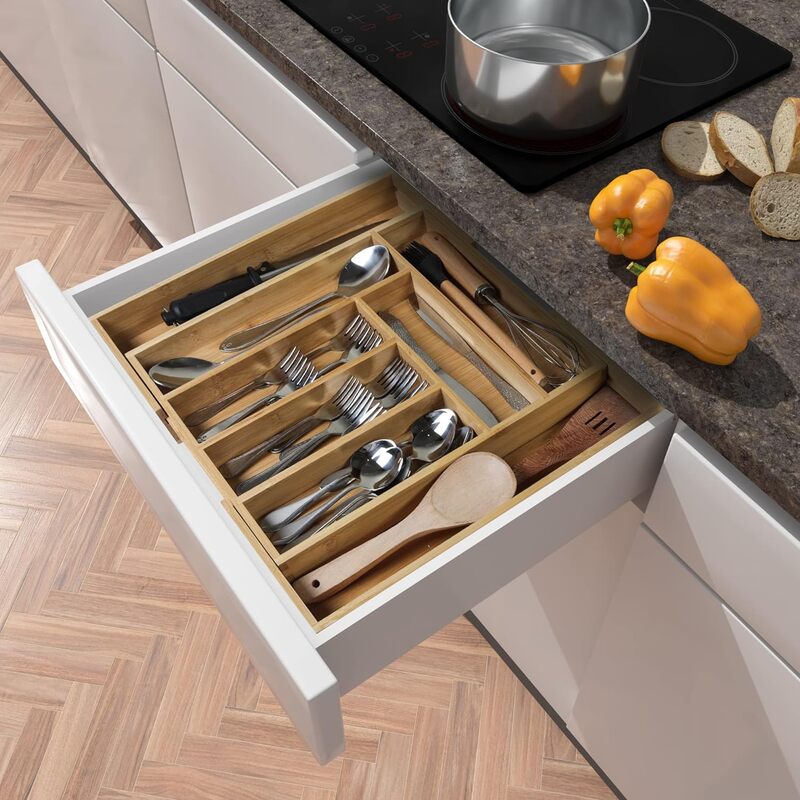 | Drawers are always our favorite for storage. Any time you can pull your supplies to you means easier access and best use of space. But a drawer alone doesn't mean all is well (thus we see the dreaded junk drawer in every kitchen). The best way to fight a cluttered drawer is with a drawer divider. Either have your cabinet supplier include custom dividers or opt for these expandable utensil organizers. |
4. Pull-Out Storage
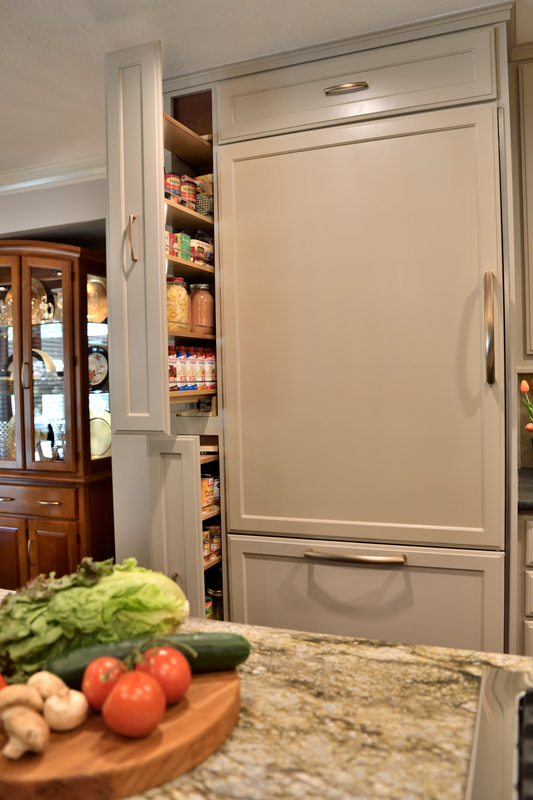
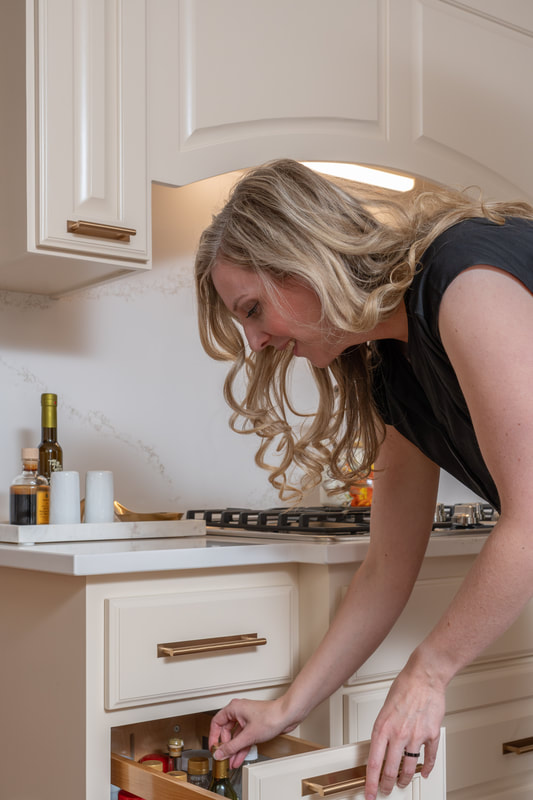
Whether it's for a wall, base, or tall cabinets, pull-out storage aids are super handy. These devices are a super functional way to keep pantry items, spices and oils, or even cutlery easily accessible. They come in multiple heights and widths and can even fit within a 3" space making them the best tools to get every square inch of space in your kitchen working for you.
 |  |
5. Blind Corner Pull-Out
| The only thing worse than wasted space is available space that isn’t easy to access. Corner base cabinets have always been a kitchen designers’ nemesis, and for many years lazy susans seemed to be the only solution. But thanks to wonderful product designers there is now a superior option on the market— the blind corner optimizer. This device helps you access all the storage space deep in the back corner of a cabinet with a choo-choo train of sliding pull-out shelves. We think these are must-haves in any kitchen design. | 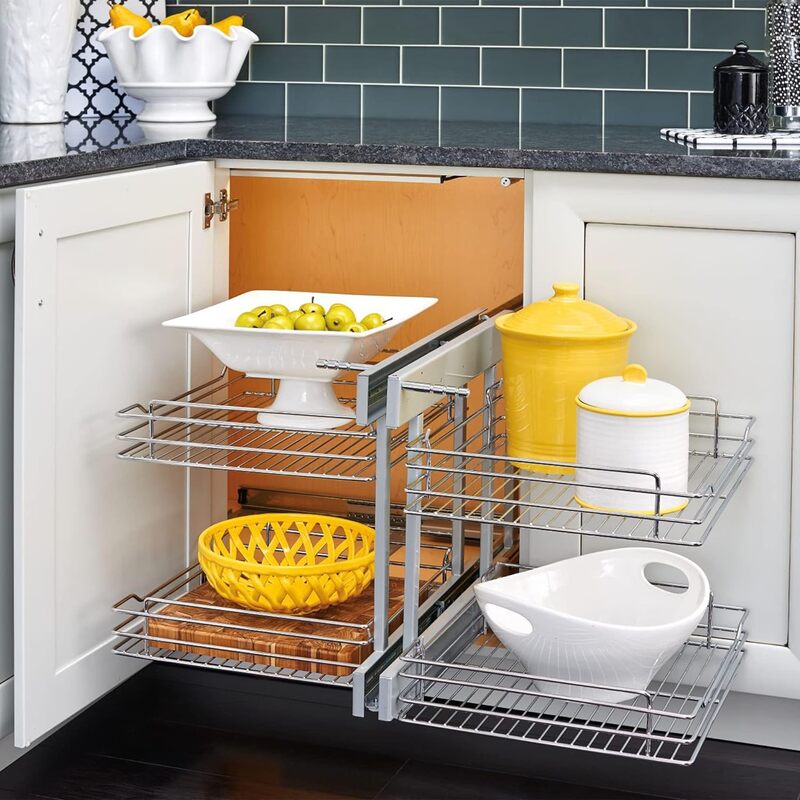 |
Bonus: Kitchen Storage Tip
The Lift-Up Appliance Garage
| Sorry folks, this storage tool isn't one you can just buy online. But it is one of our favorites, so we are adding it here with some extra tips so you can include it in your future custom kitchen design. We all love appliance garages (right photo). The lift-up countertop cabinet is one of the best ways to hide small appliances like toasters or blenders. This cabinet has no bottom and has a cabinet door that lifts up and out of the way, creating easy access for sliding the appliance toward you on the counter. | 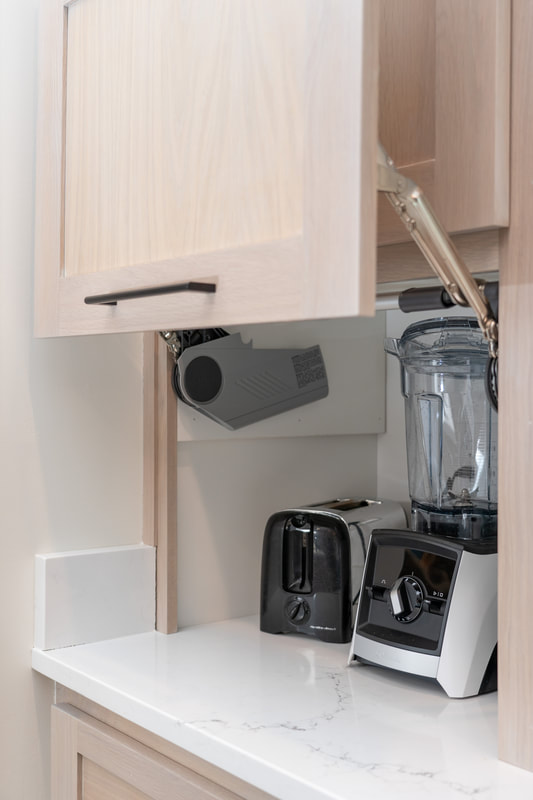 |
Here are five essential design features to add this appliance garage in your kitchen.
1. Make this cabinet and the ones above it 15-18” deep rather than the typical 12”, so it fits your deeper appliances.
2. Include 1-2 outlets in the back so you can keep the appliances in the garage without moving them out to plug them in.
3. Add an LED light inside so you don't end up with a dark cave where crumbs can hide.
4. Include a backsplash so everything is easy to clean.
5. These lift-up hinges are only good for shorter cabinets, around 18-20" high. If you want a taller door, then we suggest pocket doors.
Styling for your
Christmas or Holiday Feast
Who is ready for Part 2?! We love the holidays here at SBD, especially when it can be both beautiful and stress free. This year we are gifting all our readers and followers insight into both Christmas and Thanksgiving table styling - with bold, fun ideas that you can create on your own and on a budget. Check out Shop the Look - Holidays Part 1 for our take on Thanksgiving.
2023 Trends
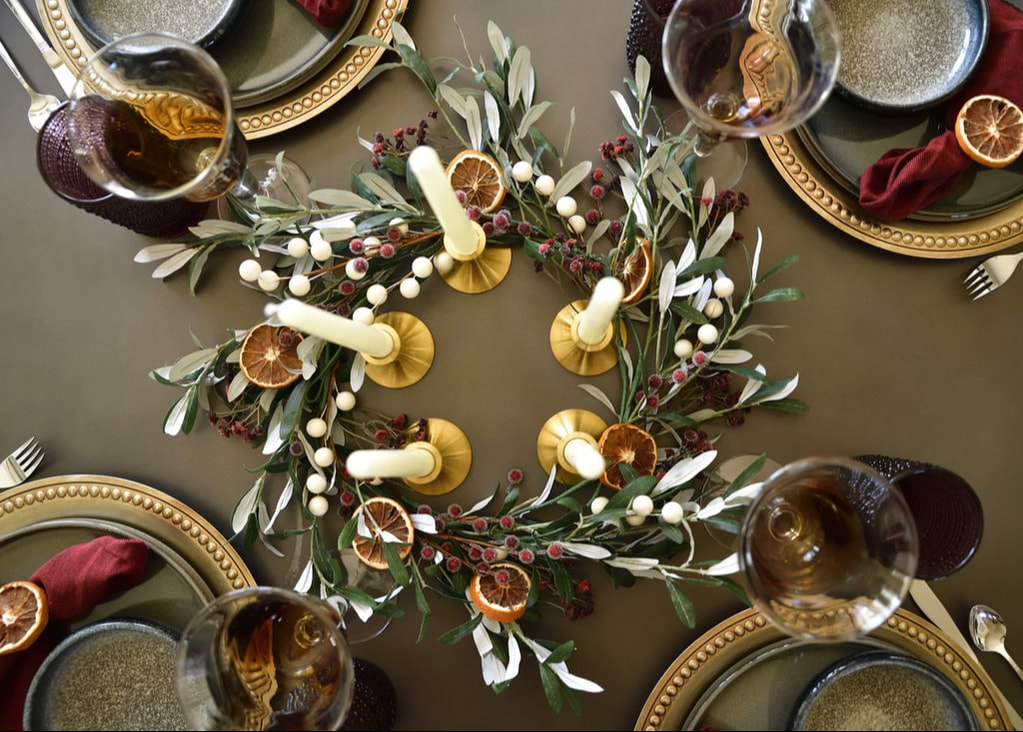
Trend 1: Moody AND Colorful Palette
 | Think pine trees glistening with snow, while snuggling next to cozy fires under a deep navy night sky. These colors translate perfectly into my favorite holiday memories and look great together for any fall or winter dinner party. That is right, you are seeing these again. We love when color schemes translate to more than one event. That (hint hint) is how you keep styling on a budget. Scroll down for more insight. |
Trend 2: Glazed Stoneware
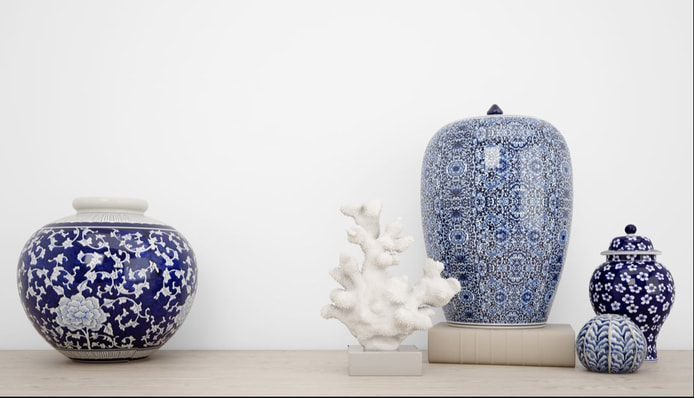
| Have you seen those pottery shows? Oh, I could watch them all day. It amazes me how these potters use their artistry and skill to throw a bowl and apply glaze to make some of the coolest reactions and unique patterns. In another life I would be at that potters wheel right now. The beauty found in glazed stoneware is making waves in the interior world. From crackling, to dripping, to cool reactive glazes, these functional pieces of art are being appreciated by more and more people. Not only do they make dynamic dinnerware, you can find beautiful vases for your flowers or multi-piece wall art installations showcasing these techniques. | 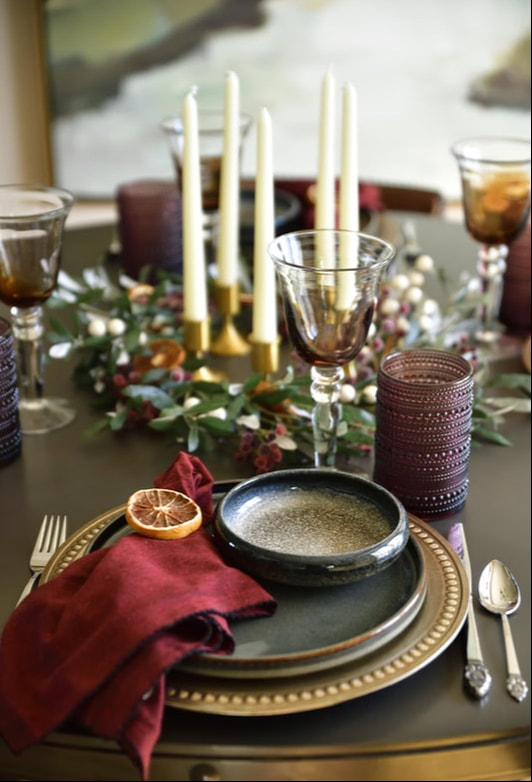 |
For our Holiday table we added a glazed plate and bowl that coordinate with the beautiful navy base color, but don't necessarily match. When you are hunting for stoneware, look for similar colors or styles, but feel free to add in pieces that used different techniques to add interest to your table.
Tips for Making this Table Your Own
Tip 1: Repeat and Repurpose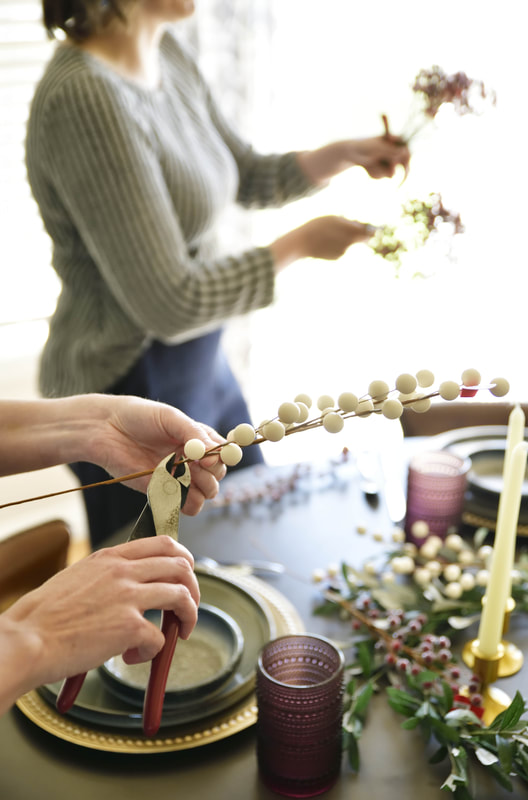 | If you checked out our Thanksgiving table design you may have noticed what pieces we repurposed for Christmas. 1. Silverware - I have a set that I inherited from my grandma that we use for holidays. No need to buy new when heirloom pieces are great to use. 2. Cranberry Drinking Glasses - yup those are the same ones we used for Thanksgiving. In fact, they are so fun to use they may be our new daily use glasses. I just love the color, texture, and price. (Scroll to the bottom for links to buy them yourself). 3. Centerpiece Greenery - this piece of simple 5' greenery I bought years ago at Target and it has been repurposed so many times. For this table, I added some different accents like white faux berries, frosted cranberries, and dried fruit. |
Really, you could repurpose a lot from one holiday and use it for the next, especially if you are using the same color scheme. Although we are showing you more ideas, you could easily save some $ and reuse many of the same table setting pieces.
Tip 2: Remember that Texture Adds Depth
Oh the beauty and interest that texture can add to a table. It's the design element that takes your everyday dinner table to a special event. How does one add them correctly?
| First: add lots of different types of texture. Look for both visual and actual texture. See the great glazing technique on the plate. That is visual texture. The nubby surface design on the cranberry drinking cup represents actual texture. Soft fabrics and shiny metals are more great textures. Second: Layer, Layer, & Layer. This is one of my favorite design techniques. Gradate size with chargers and plates so that you can appreciate all the different textures. Add 2 drinking glasses, not just for guest preference, but also to show off multiple textures and colors. | 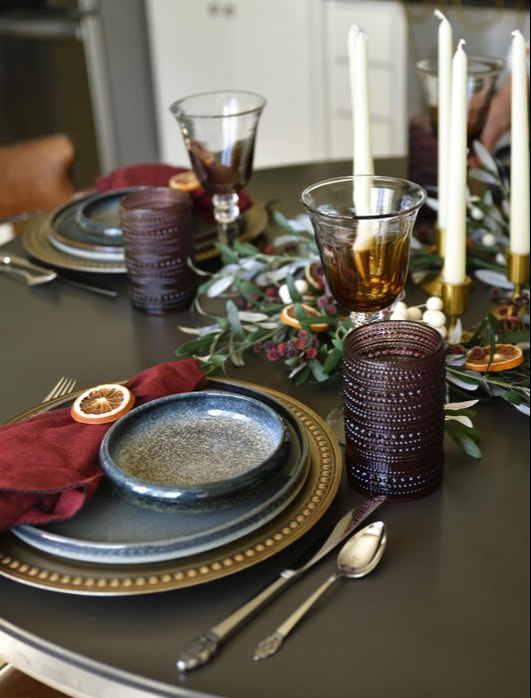 |
Tip 3: DIY Dried Oranges
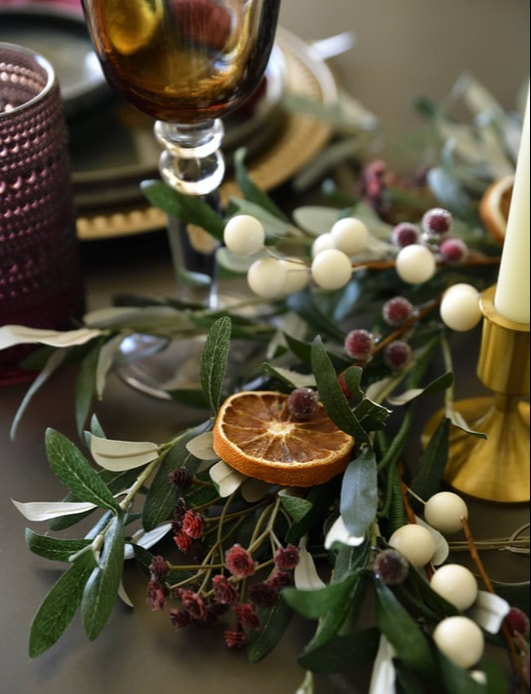 | Are you looking for a fun, inexpensive activity to do with your kids? Consider making your own dried fruit. These dried orange slices are an easy DIY activity that allows your kids to help with the table decor while adding a natural element to the table. There are a myriad of recipes online but here is one blogger with great advice. Barley and Sage *As an additional note, if you are planning to string the orange slices consider cutting a hole in one of the segments before drying them. That way it is easy to slide wire or ribbon through them. |
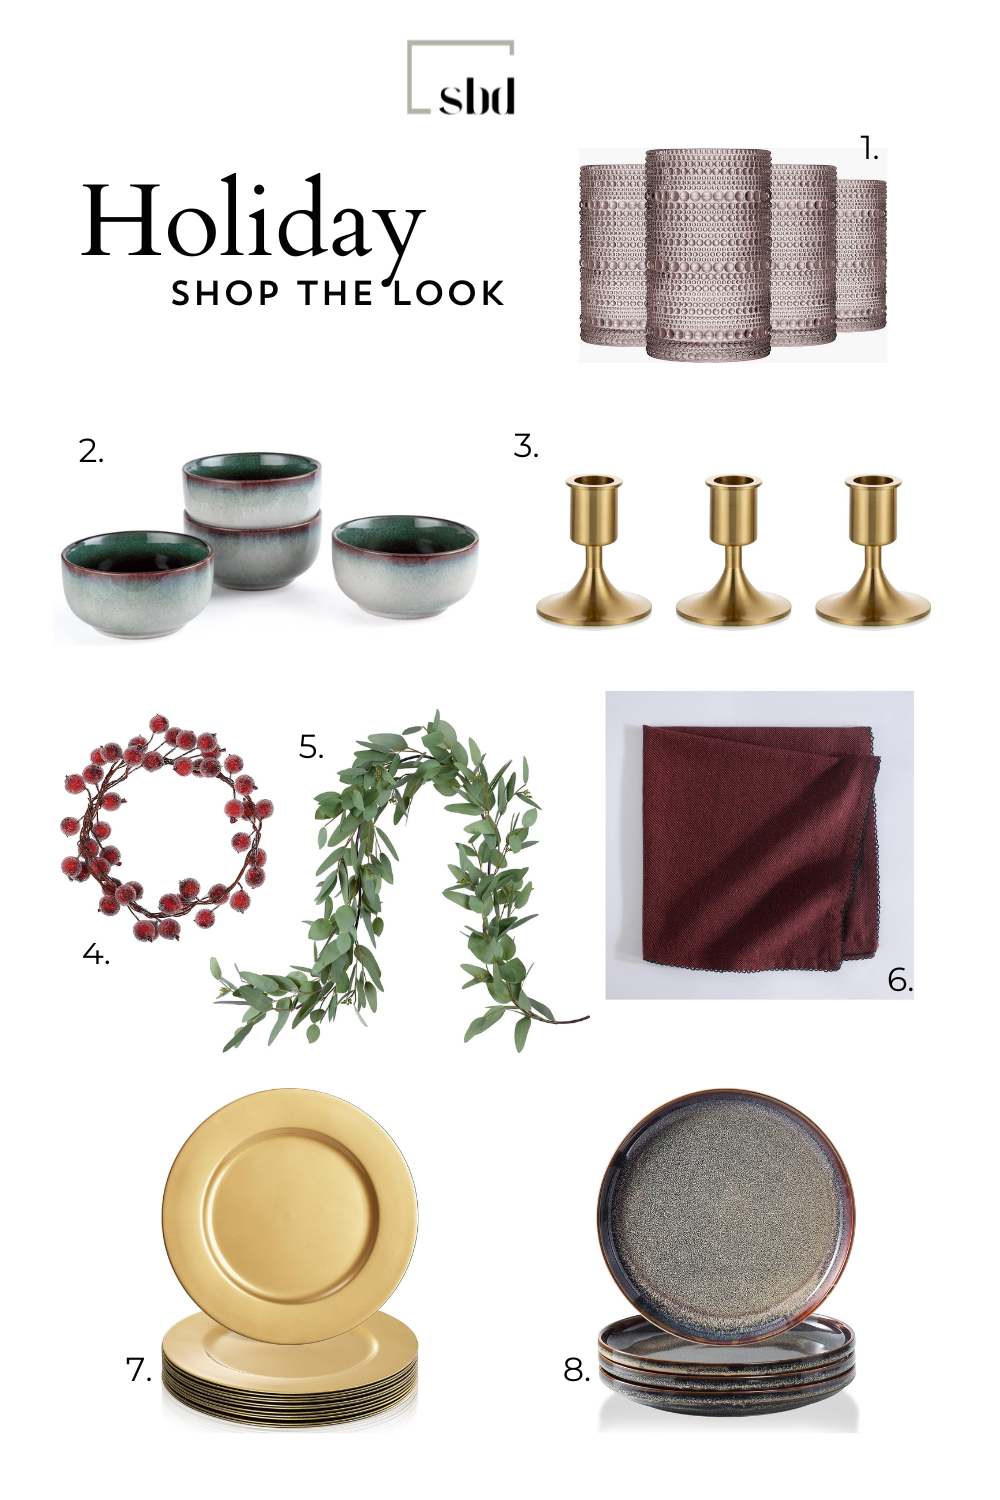
Shop The Look - Links
Want this look for yourself? Check out the shoppable links below of some of the exact items we used in our Holiday table setting. But feel free to add your own mix with what you have in your collection.
Styling Your
Thanksgiving Table
Are you looking for new ideas to make your Thanksgiving or fall themed dinner party a bit more special this year? We are seeing striking trends this year and want to share with you some simple ways to add them your existing entertaining supplies.
(You may have noticed the Part 1 in the title. That's right, we are going to not only give you tips and tricks for the fall season, but we are looking ahead to Christmas as well. So make sure you check out the next blog article. You will notice how some of the purchases can be used for both holidays. We love a two-for!! )
2023 Trends
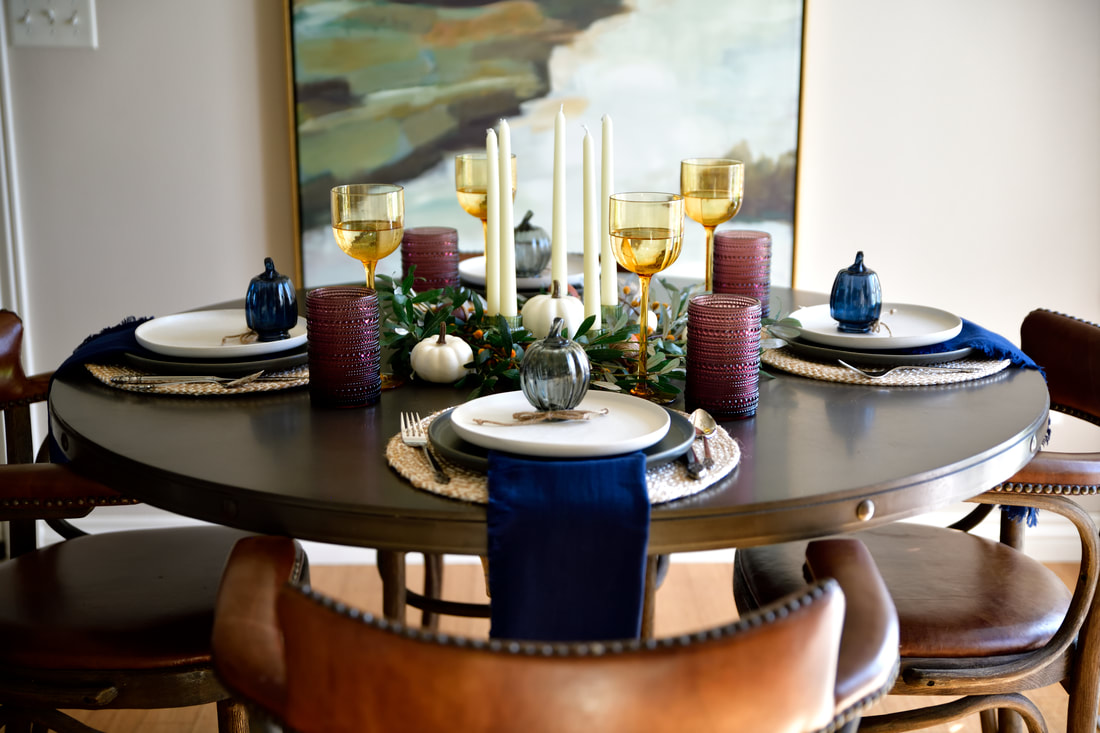
Trend 1: Moody Yet Colorful Palette
 | Oh how we love color! Deep, bold tones are becoming more common not just in accessories but in all-over painted rooms. This color palette creates moody environments that encourage cozy snuggles and thoughtful contemplation. They are easy to add to warm and cool neutral homes. We highly suggest adding all the colors together to make a more exciting tablescape, but if that seems too bold, at least choose two, to really get the vibe of this colorful trend. |
Trend 2: Colored Glass
| One of the best ways to play with color is in colored glass. There are so many ways to add tonal sparkle to your table: stemware, candle holders, light fixtures, beading, stained glass, and translucent accessories. If you are a little nervous to put so much glass around your children or klutzy friends, consider the easy alternative—colorful translucent plastics. The possibilities are endless! | 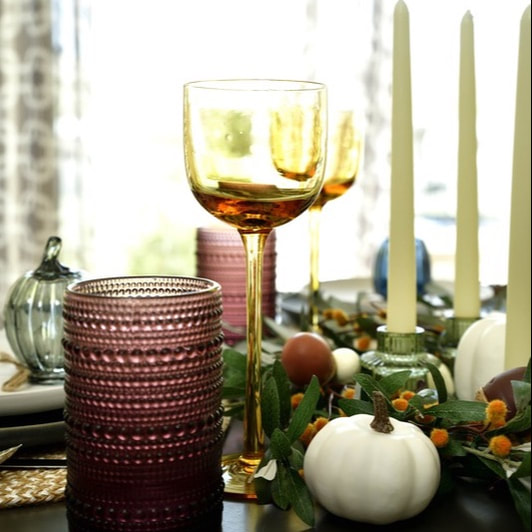 |
Tips to Making it Your Own
Tip 1: Utilize Your Basic Supplies
 | Before you go out and buy all new plates and glasses, take inventory of your current supplies. - What dishes, linens, and decor already works with this color scheme? Having a set of neutral dishes makes it easy to use them for multiple color schemes. - Not enough place settings? Can you mix and match to make a full set? We love layering plates and using mixed sets. - Do you have any holiday decor that could be reassigned to the table? Grab a couple pumpkins off the mantle to fill in gaps in the middle. - Do you already have greenery that just needs a few added fall touches? One basic greenery strand can be repurposed for almost any holiday or season. |
The goal is not to recreate this exact look but to be inspired and make your own unique interpretation.
Tip 2: Add Vintage and Dollar Section Items
| As much as we love the the new luxury products out there, you can never go wrong when you bargain hunt. Check out your local thrift stores and estate sales for unique vintage finds—especially glassware and candleholders. Another of our favorite haunts is the Target dollar section. Can we get an amen?! That's where we found the little glass pumpkins to put on the plate, for just a couple bucks. They always have fun, seasonal items that don't break the bank. | 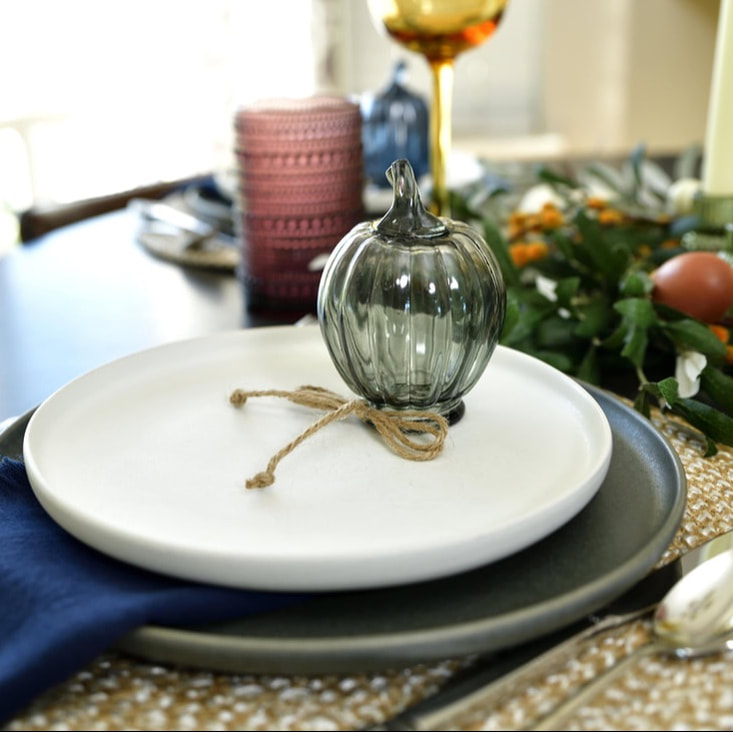 |
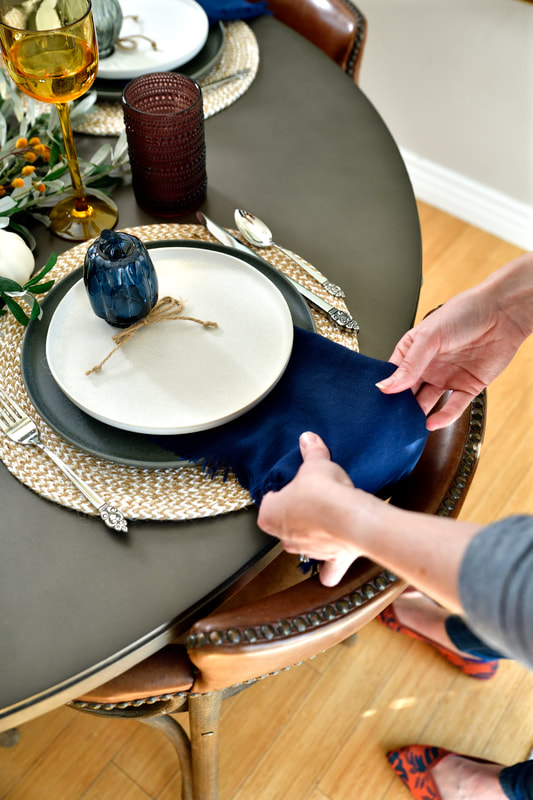
Tip 3: Mix Textures and Add Layers
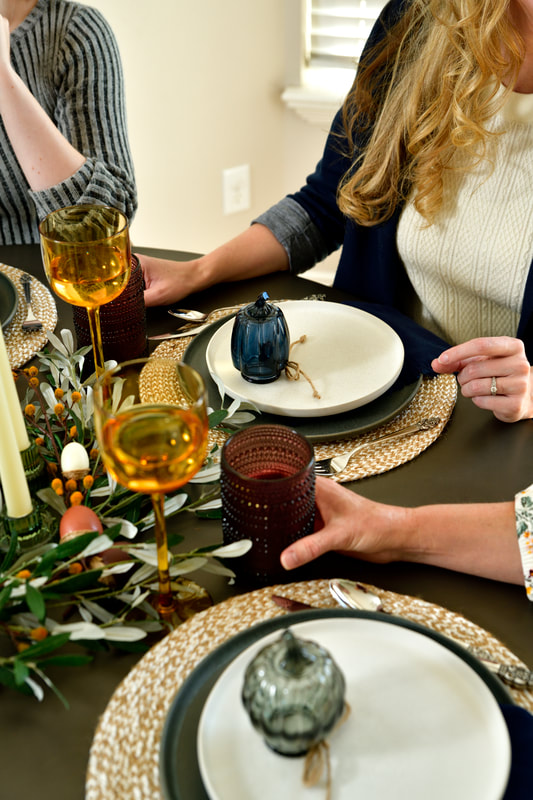 | The more layers the better it looks. Stacking different textures or patterns helps create depth and interest. Not everything has to match, in fact, matching sets can be boring. As long as you stay within the general color scheme, it will look amazing. The main rule is— have fun with it! We don't set our tables like this very often, so throw Emily Post's book out the door. If it puts a smile on your face then you are doing it right. |
Shop The Look - Links
Below are some of the exact items we used, or similar ones, that you can buy today to replicate this look for your upcoming Thanksgiving party.

1. Red Colored Drinking Bubble Glasses
2. Small White Pumpkins
3. Green Glass Candle Holders
4. Woven Jute Placemats
5. Navy Linen Napkins
6. Fall Garland
7. Minimal Gray Plates
8. Minimal White Plates
2. Small White Pumpkins
3. Green Glass Candle Holders
4. Woven Jute Placemats
5. Navy Linen Napkins
6. Fall Garland
7. Minimal Gray Plates
8. Minimal White Plates
Bonus Tip: Other than the pumpkins and fall garland, everything above can be used for other holidays, or even every day, so don't feel bad about investing more.
 | Have you ever asked yourself that question? I can see it now. You are standing in the middle of your small, dark kitchen, looking over the peeled or damaged cabinets, the counters cluttered with all the stuff you wish you could put away but have no room for, and think to yourself, “there has to be a better way to design this space.” Whether you are looking to upgrade your current space or start from scratch with a new home, the question still comes down to… Do I need to hire an interior designer? |
I get that question a lot. At what point can you do it on your own, and when do you need a professional? There are a couple factors that go into any decision, and often times it’s the bank account choosing for you before you can even consider it. Obviously, designers don’t work for free. I get it, I truly do. But before you make the final decision, consider my few points of why investing in a designer is a valuable decision… even for your bank account.
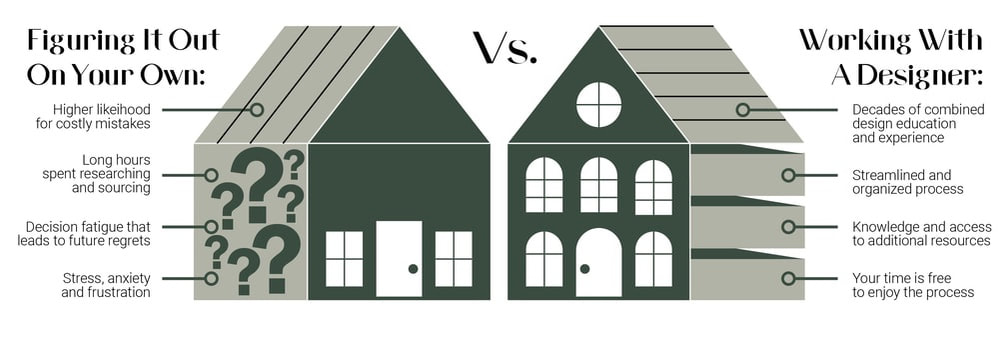
1. The Value in a Positive Experience
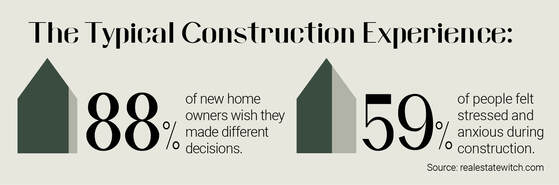
A real estate website recently polled homeowners who completed new homes in the last couple years. They found that 88% of homeowners wished they had made different decisions and 59% of people felt stressed and anxious during the construction process. Source I am sure it comes as no surprise that construction and moving can be one of the most stressful times in our lives outside of marriage, health, and financial turmoil. It is a messy, long, and expensive process filled with sleepless nights, second guessing, and a laundry list of decisions that you have to make.
But what if we could wave a magic wand and get both an amazing design and keep your sanity?
A good designer is the expert in your back pocket that will take the majority of weight off your shoulders. Using their knowledge and experience, they will guide you to make the best choices for your home and will help you know what to expect during each phase. Imagine sitting back and having someone take your thoughts and interpret them into your dream home. All you have to do is say, “yes, I like that,” or “no, show me something else.” A good designer will take what can be a really frustrating, scary process and make it a clear, enjoyable experience.
2. The Value in Good Design
Have you ever walked into an awkward space and thought,
“what was this person thinking?”
I am going to let you in on a secret, sometimes they aren’t. Not everything built is actually well thought out. I have seen countless times (even in new construction) where a living room can’t fit normal sized furniture, a kitchen doesn’t have enough drawers, and a window was not centered on the wall. Those seem like obvious things, right? When it comes to construction, getting it built sometimes takes precedence over considering how people will want to use the space when it’s complete.
| That is where a good designer comes in. We consider not just how it looks but how it functions. It’s all about you, the homeowner, and how can we cater the design to fit your lifestyle and express your values. | 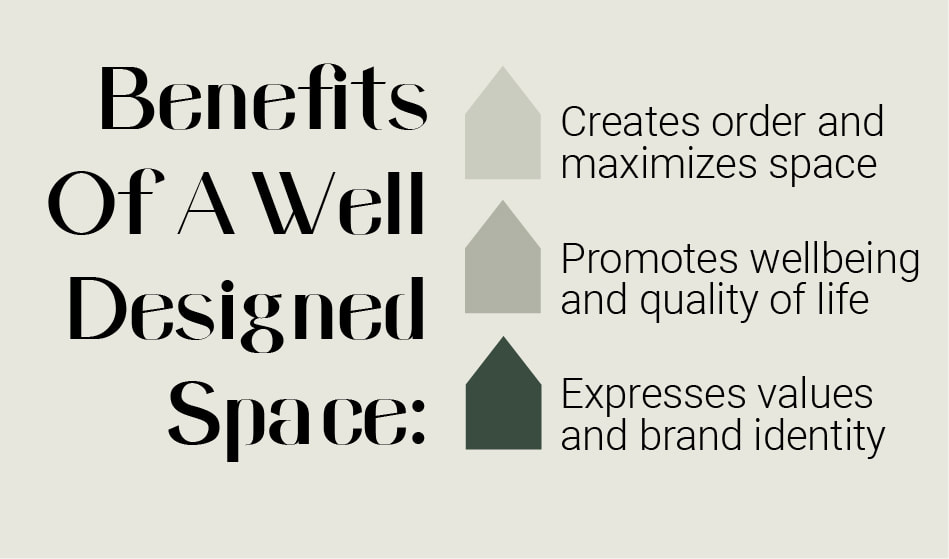 |
From floor plan to finishes, color scheme to lighting, and even furniture to décor, your lifestyle and values affect everything. That type of customization and consideration has incredible value. Don't waste your money on a design not well thought out.
3. The Value in Confident Details
The devil is in the details. No truer statement than when dealing with construction. There are so many details to consider and your contractor will expect you to make them on the spot. But did you know that if you make one choice now it can affect your options down the road, such as where you can place stone on the exterior or where you can add lighting? The last thing you want is to make a flippant choice now, because you are tired from decision fatigue, and find out later that you painted yourself into a corner.
Hire a designer to help you sift through those decisions early on. At Sonia Barney Design we specialize in creating design books after we have gone through the whole design process so that you have all your decisions organized at your fingertips. Then when your contractor asks if you want this or that, you can refer to the book and give him confident answers.
 | There will be much fewer mistakes and confusion if you have a road map with all the decisions made in advance. |
Bank Account Bonus!!!
Hopefully you can see that a designer will add incredible value to the experience and the end result of your project. But we still can’t get away from the fact that designers cost money, and not just a couple bucks either. So let me list the ways that a good designer can help your project’s financial success.
- Avoid change orders – these occur when you come up with the best idea after something is already built and the contractor has to go back and redo things. No need for change orders if you have the design already set before you begin construction.
- Lower subcontractor fees - decisions and detailed design books made in advance mean the contractor and subs can order finishes, line up people, and quickly and efficiently implement the design with minimal questions on site. A lot of the subs are paid per hour, so the more efficient the process, the lower the invoice.
- Avoid construction delays – as mentioned above, a detailed design book helps speed up a project, which means less days of you paying for alternative living conditions and the contractor to manage the project.
- Avoid taking time off from work – the right team in place means that you can avoid spending long hours researching, sourcing, and managing the project, and focus on what you do best.
- Increase return on investment – ROI is huge when it comes to your future bank account. Someday you may want to sell this home. The decisions you make today will increase or decrease the value of your home, and a designer can help you navigate those.
| The next time you are ready to take the plunge into the home remodel or new construction world, consider the value of a good designer and the many services they offer. Do your research and find the one that will best suit your personality and needs. If you are interested in working with Sonia Barney Design, feel free to schedule a free Introductory Phone Call today. We would love to get to know you and see if we are the ones to help you make a home built just for you. | 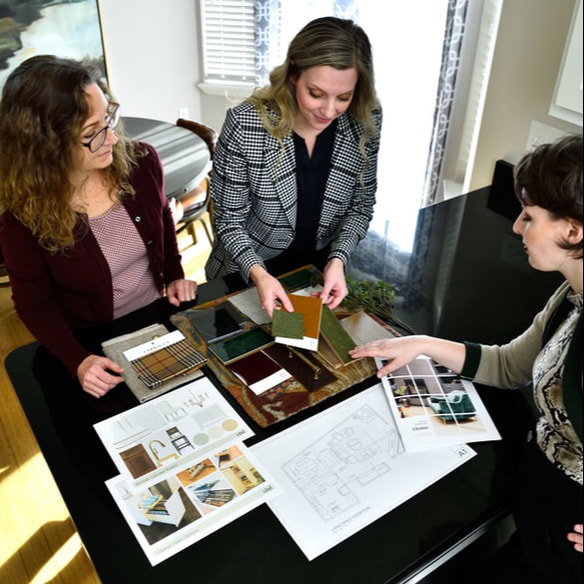 |
Spring is in the air…well almost. While we wait for the snow to melt, what better time to update your space to herald a season of renewal and growth. The SBD Spark Blog was created to provide you the tools to add design, style, and functional upgrades to your space on your own. With that in mind we are excited to introduce seasonal Shop the Look posts with specific key features:
- Style Focus each season on one of our favorite styles with historical tidbits and identifying elements
- Room Focus each season with a list of “ingredients” for a successful space
- 2 Complete Looks to use as inspiration for your home
- Shoppable Links to quality furniture and accessories you could buy today to add to your space - these are not items you will find at the store down the street
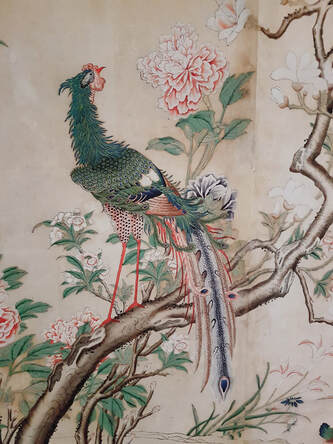
The Style: French Chinoiserie
We have seen a huge resurgence of appreciation for historical styles from many popular designers on tv and online. We are sure you have noticed designers looking back in time for inspiration but then blending it into today with more modern, clean lines.
We also love historical design at Sonia Barney Design. Today, we are taking inspiration from 17th and 18th Century French style and how it included influences from cultures all around the world. Thanks to expanded trade routes at the time, the bourgeoisie loved combining the indulgent Baroque and Rococo styles with elements inspired by East Asian art and design. These elements were often described as Chinoiserie, or “in the Chinese style”.
You can identify French Chinoiserie through the use of:
- Blue-and-white motifs commonly found on Chinese porcelain
- Extensive gilding
- Chinese patterns and figures in furniture, art, and surface painting
- Extravagant scenery and floral designs in wallpaper and fabrics
 |  |
For more examples and design inspiration, take a look at these articles by Hadley Keller and Elizabeth Stamp.
As per our designer prerogative, we choose to be inspired by French Chinoiserie but still add our modern flair. Scroll to the bottom to see our modern interpretation which is perfect for a springtime refresh.
The Space: The Entry
The entry to a house is one of the most overlooked spaces, yet is one of the most commonly used. Not only do you pass through it everyday taking off your workday woes, this space is an introduction to your home. What first impressions does your entry give to your guests? Is it cluttered or organized? Does it showcase your values? By following the recipe below, you can personalize your entry and make it not only stand as a hallmark of your family, it can make entering and exiting more pleasurable.
So what elements do we need in an entry? Let’s break it down. Your entry needs the following ingredients:
- Hero Piece
- Concept Inspiration
- Light and Reflection
- Functional Support
- Foundation
- Personality
So what elements do we need in an entry? Let’s break it down. Your entry needs the following ingredients:
- Hero Piece
- Concept Inspiration
- Light and Reflection
- Functional Support
- Foundation
- Personality
Let's Build Your Chinoiserie Inspired Entry
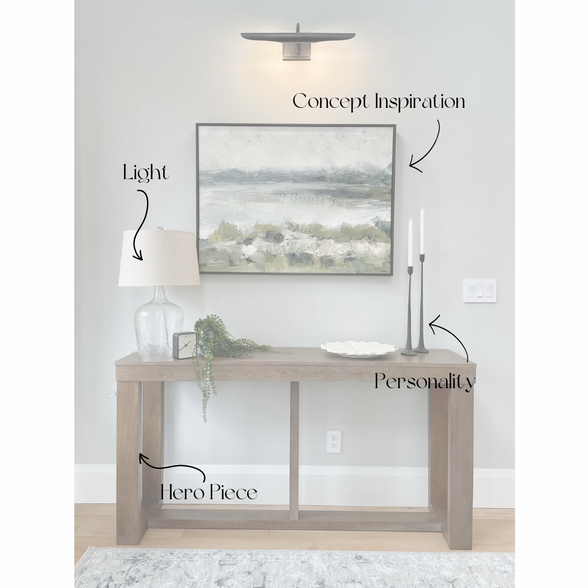
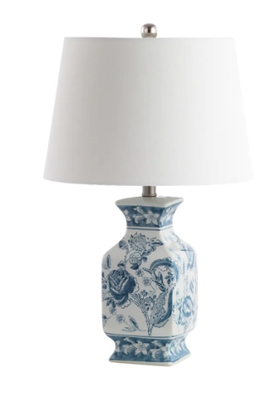
Hero Piece
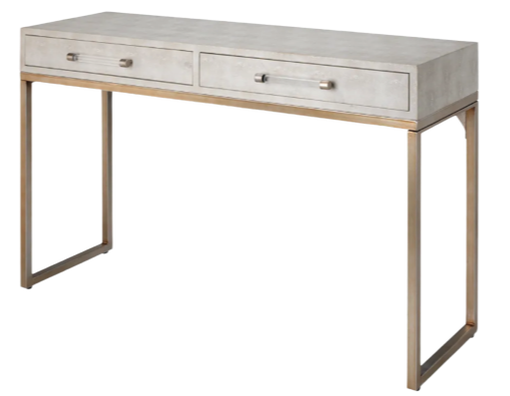
At SBD, we believe every space has a main role, and the furniture piece most closely tied to that role is the “Hero”. In a bedroom, it's the bed. In the dining room, it’s the dining table. In the entry, it's the console table. The console table grounds the function of this space, providing a location to deposit keys, take off your shoes, and breathe a sigh of relief saying “I’m home.” Here are 2 possible console tables. If you tend to have a lot of clutter in your entry, we suggest a console with drawers.
 |  |
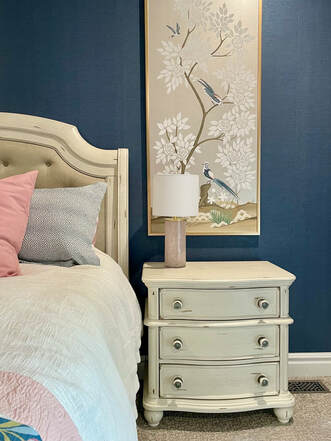
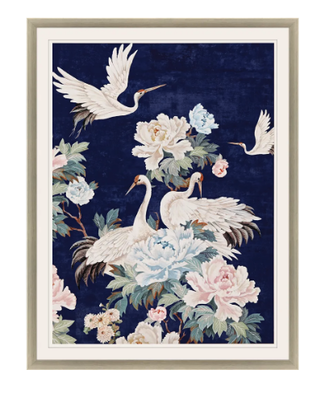
Concept Inspiration
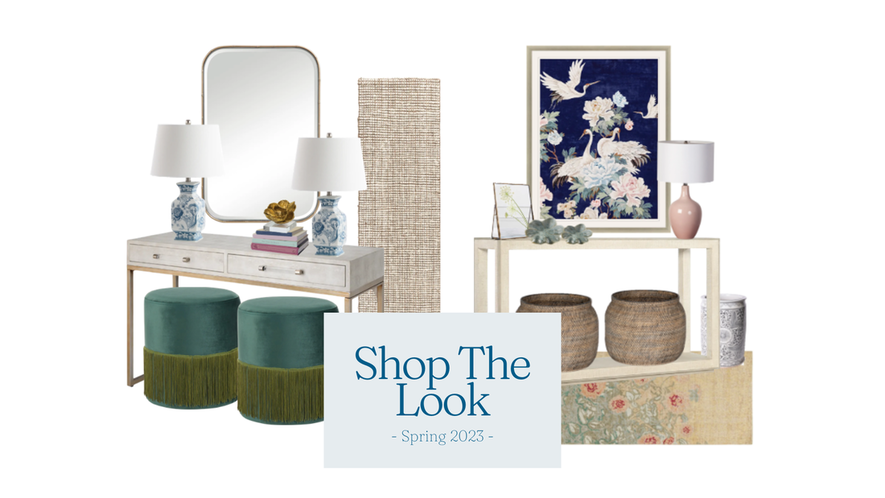
Next, choose a concept inspiration piece that you love. It can be a light fixture, piece of art, or even a wall finish. Just choose something that inspires the vibe and identifies the color scheme. Obviously we wanted to display the Chinoiserie style, so we found a couple pieces that showcase those iconic organic patterns in a fun spring color palette.
 |  |
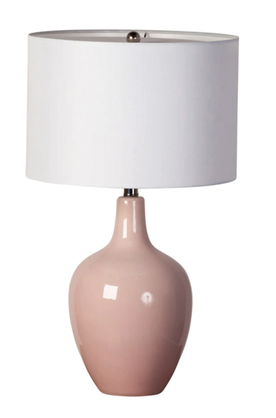
Light and Reflection
Entries are notorious for being smaller than we wish. This is where well trained designer pulls out their secret weapons: light and reflection. Don't just rely on one light source in your entry. Adding lamps plus a beautiful pendant will make the room feel brighter and more welcoming. And we all know how mirrors can double a space. But really any reflective surface can help with that illusion. If you don't have a mirror, add shine and sparkle somewhere. Bonus: mirrors are perfect for final touch ups as you leave the house. What a great double duty piece!
 |  |
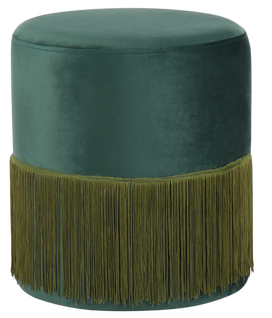
Functional Support
Now it's time to determine the secondary functions you want your entry to provide. Do you sit and take off your shoes? Do you need a place to store dog leashes and extra shoes? Knowing how you want to use the space will help you select between extra seating in the form of small ottomans or stools, or if you need extra storage to eliminate clutter.
 | 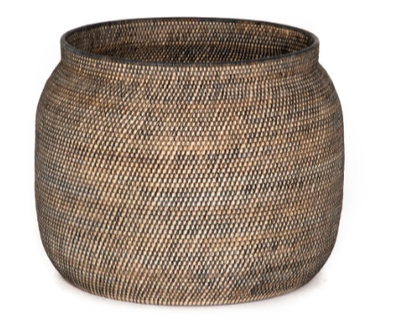 |
Foundation
An entry isn't complete without an entry mat or rug runner. It is necessary to help keep the outdoors from spreading through the rest of the house. Look for durable rugs that are easy to clean or shake out. To coordinate with our style, we suggest sisal, lattice, or floral pattern rugs. And when it comes to sizing - don't be afraid to go large. Postage stamp sized rugs are a thing of the past. Leave around 12"-24" of space between the walls and rug.
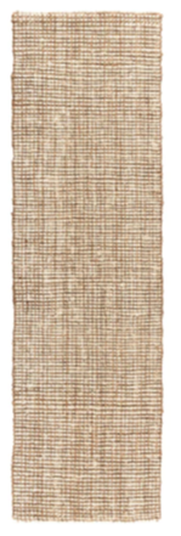 | 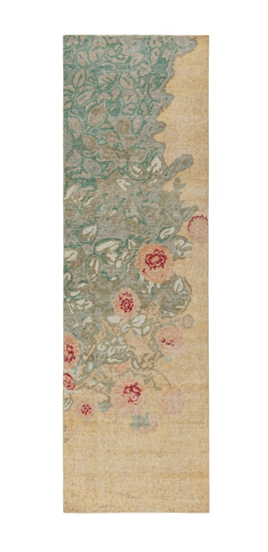 |
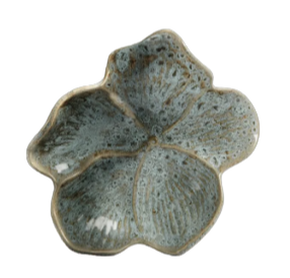
Personality
Last but not least, let's add the final touches. Whatever you call it—accessorizing, decorating or styling— it's all about adding the right personality to complete the look. Fill your entry vignette with the right items that showcase your family, interests, collections, travels, etc. They can even double duty as extra storage.
This is your home. Make it yours.
This is your home. Make it yours.
 |  |  |
 |  |  |
The Final Look
Chinoiserie Inspired Entry #1
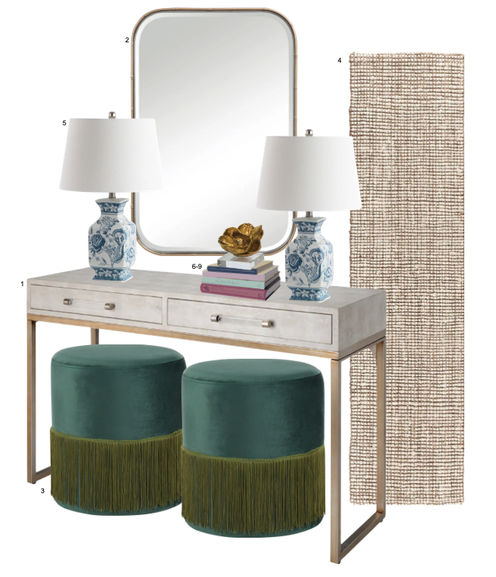
Shop This Look:
1. Console Table
2. Mirror
3. Ottomans
4. Rug
5. Lamps
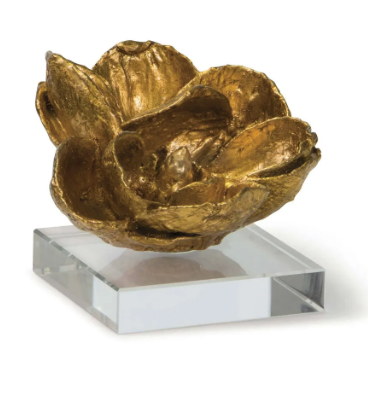
6. Gold Magnolia
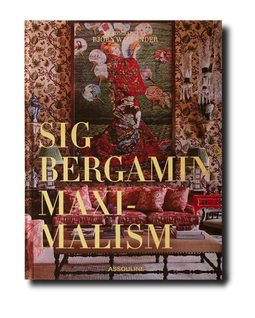
7. Book: Maximalism by Sig Bergamin
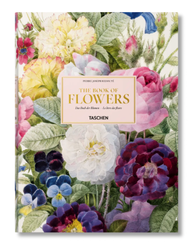
8. Book: Redoute. The Book of Flowers
9. Book: Audrey Hepburn by Bob Willoughby
1. Console Table
2. Mirror
3. Ottomans
4. Rug
5. Lamps
6. Gold Magnolia
7. Book: Maximalism by Sig Bergamin
8. Book: Redoute. The Book of Flowers
9. Book: Audrey Hepburn by Bob Willoughby
Chinoiserie Inspired Entry #2
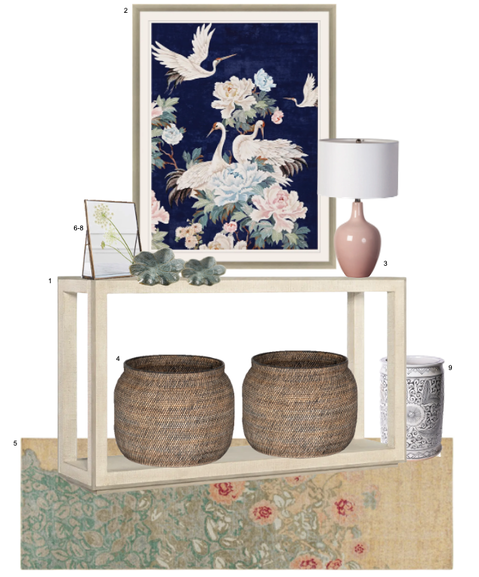
Shop This Look:
1. Console Table
2. Artwork
3. Lamp
4. Baskets
5. Rug
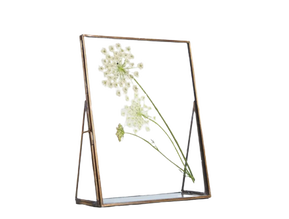
6. Picture Frame
7. Magnolia Plate 8"
8. Magnolia Plate 12"
9. Umbrella Vase
1. Console Table
2. Artwork
3. Lamp
4. Baskets
5. Rug
6. Picture Frame
7. Magnolia Plate 8"
8. Magnolia Plate 12"
9. Umbrella Vase
What's Hot and
What's Not in 2023
Written By: Sonia Barney
| It's a couple weeks into the new year and I’m already seeing a rejuvenation in design. No longer are we keeping things calm, and quite frankly, boring, in response to the dreaded 2020. Life is being infused back into our homes with full abandon. Take for example Pantone's Color of the Year, Viva Magenta. Below is a list of trends I see on the way out, and the ones I see replacing them. But always remember, if you love it, it doesn’t matter what other people think (including me)! However, if your home feels dated and you’re looking to make some changes, these ideas will steer you in the right direction. | 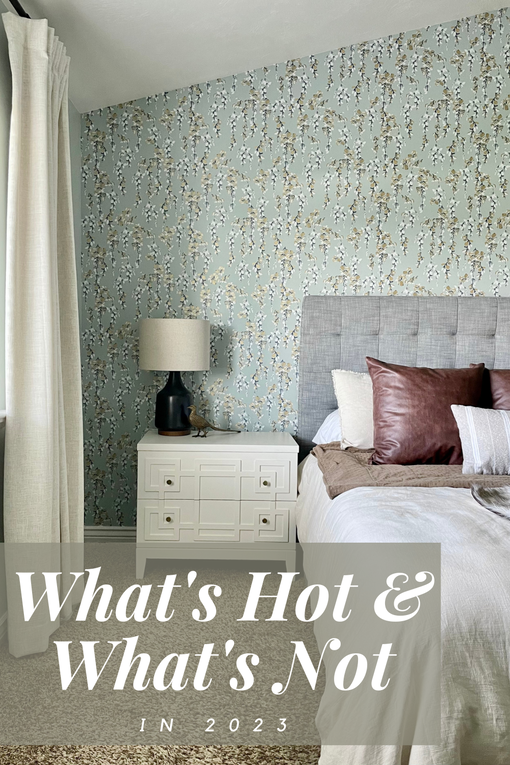 |
Trends on Their Way Out
#1 - White Shiplap
Can I say overdone? (With apologies to my shiplap loving friends.) It was a great idea until it was, well, everywhere. I recognize it was a perfect way to create an inexpensive accent, but I just can't endorse its use any longer! When every builder adds at least one accent wall in each of their new builds, then it’s no longer special.
Can I say overdone? (With apologies to my shiplap loving friends.) It was a great idea until it was, well, everywhere. I recognize it was a perfect way to create an inexpensive accent, but I just can't endorse its use any longer! When every builder adds at least one accent wall in each of their new builds, then it’s no longer special.
#2 - Cheap Collage Walls
You wouldn't know it by my over-stuffed office, but I’m a minimalist at heart. I don't feel the need to display everything I own—especially knowing that it’ll have to be cleaned. Collage walls came into vogue when collectors started displaying their beloved treasures in a unique maximalism potpourri. (Which I fully admit is still amazing.) But are you a collector? Do your items tell a story and have special meaning? Then by all means, display them. But if you have to go out and buy items to make your collage wall, then save your money. Don't do it. There are cleaner and more elevated looks for your home. (see below)
You wouldn't know it by my over-stuffed office, but I’m a minimalist at heart. I don't feel the need to display everything I own—especially knowing that it’ll have to be cleaned. Collage walls came into vogue when collectors started displaying their beloved treasures in a unique maximalism potpourri. (Which I fully admit is still amazing.) But are you a collector? Do your items tell a story and have special meaning? Then by all means, display them. But if you have to go out and buy items to make your collage wall, then save your money. Don't do it. There are cleaner and more elevated looks for your home. (see below)
#3 - Plant Shelves
One of the banes of this designer’s existence... plant shelves (at least that is what I call them.) They are those open drywall ledges cut into your walls often seen high up towards the ceiling. Like their close cousin, the collage wall, these areas end up being not much more than a dust collector. At one point, did all home builders and local architects decide this feature is the pinnacle of design? They are prolific, and in turn, many homeowners wonder how to style these random spaces at the top of their vaulted ceilings. The answer is simple, do nothing! Again, unless you have an amazing collection of the right sized objects that needs to be displayed, do not go buy a bunch of useless objects to fill the spot. You don’t want to feel guilty about not cleaning up there regularly. In fact, the next time you have a contractor in your home, ask him to frame that area in. Clean, vertical wall at 10 feet off the ground is much better than a useless collection of stuff you can barely see.
One of the banes of this designer’s existence... plant shelves (at least that is what I call them.) They are those open drywall ledges cut into your walls often seen high up towards the ceiling. Like their close cousin, the collage wall, these areas end up being not much more than a dust collector. At one point, did all home builders and local architects decide this feature is the pinnacle of design? They are prolific, and in turn, many homeowners wonder how to style these random spaces at the top of their vaulted ceilings. The answer is simple, do nothing! Again, unless you have an amazing collection of the right sized objects that needs to be displayed, do not go buy a bunch of useless objects to fill the spot. You don’t want to feel guilty about not cleaning up there regularly. In fact, the next time you have a contractor in your home, ask him to frame that area in. Clean, vertical wall at 10 feet off the ground is much better than a useless collection of stuff you can barely see.
Trends on the Scene
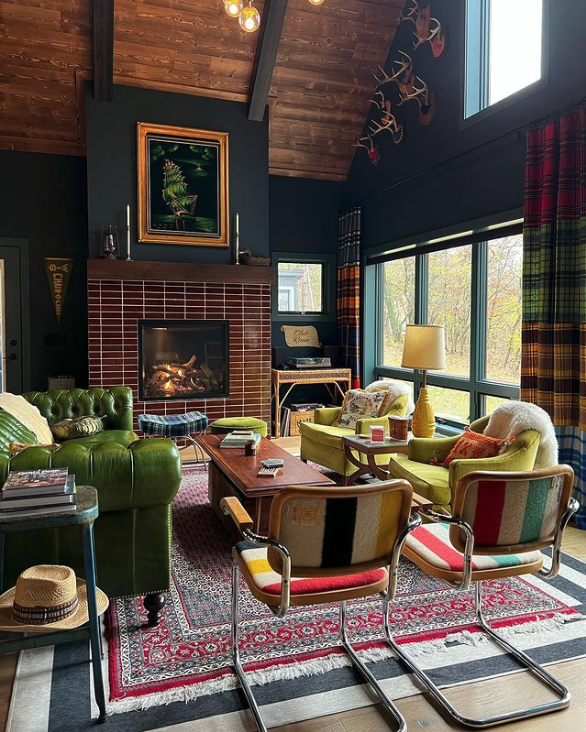
#1 - Bold and Dark Paint Colors
As much as we love an all-white home, special rooms swathed in a dark toned paint color will make anyone swoon. From deep plums to forest greens, and even black, these bolder wall-to-wall paint choices are an inexpensive way to express personality and create a vibe. Take a look at how some designers have bravely applied this trend.
As much as we love an all-white home, special rooms swathed in a dark toned paint color will make anyone swoon. From deep plums to forest greens, and even black, these bolder wall-to-wall paint choices are an inexpensive way to express personality and create a vibe. Take a look at how some designers have bravely applied this trend.
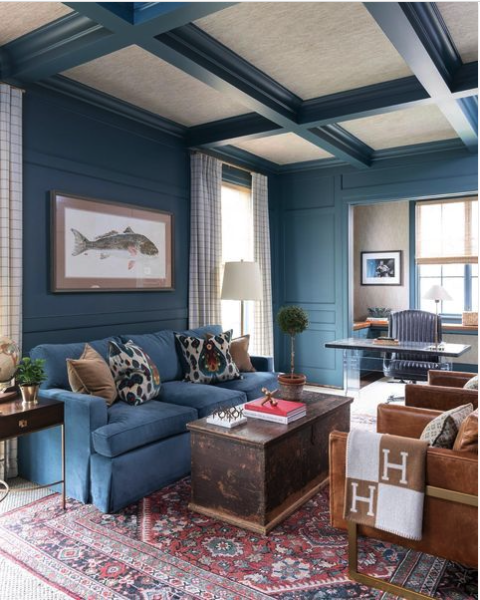

#2 - Pattern Mixing
Maximalism is the art of "more is more." You can do that with more accessories or, in the way I prefer, mixing and layering color and pattern throughout the space. Why choose only one tile for your backsplash? Why play it safe with plain white drapes? Why only have pattern on throw pillows? Start playing with contrasting patterns and materials on your wall, furniture, window treatments, and decor and make something uniquely yours. Need inspiration? Check out these amazing spaces below that prove mixing patterns is not just a old grandma look.
Maximalism is the art of "more is more." You can do that with more accessories or, in the way I prefer, mixing and layering color and pattern throughout the space. Why choose only one tile for your backsplash? Why play it safe with plain white drapes? Why only have pattern on throw pillows? Start playing with contrasting patterns and materials on your wall, furniture, window treatments, and decor and make something uniquely yours. Need inspiration? Check out these amazing spaces below that prove mixing patterns is not just a old grandma look.
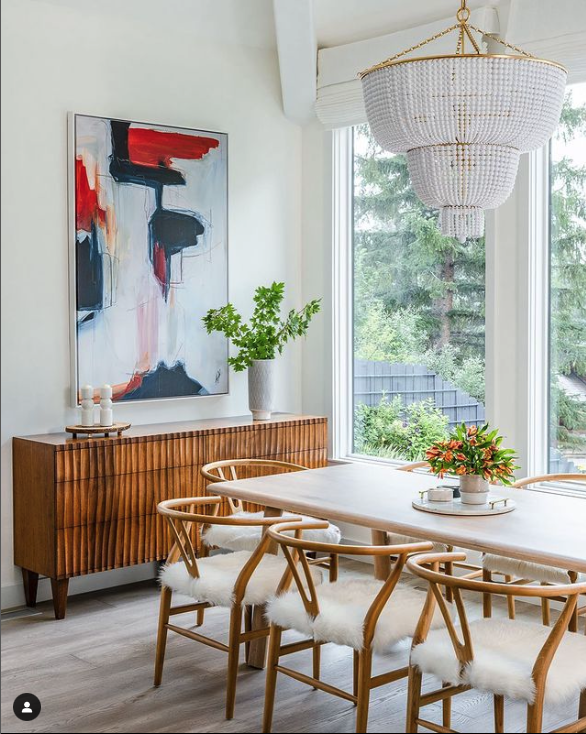
#3 - Oversized Art
You know how I said I’m over collage walls? This may leave you asking, “Then what do I put on my walls?” The answer is simple - go big! Invest in oversized art. I don't care if it’s a framed family picture or an amazing wall sculpture of a hamburger. Let your art cover the wall and make a spectacular focal point in the space. Added benefit: oversized artwork can enhance an architecturally deprived space (such as the lack of fireplaces or trim work). Don't take my word for it. See for yourself how these designers have completely upleveled the space with art.
You know how I said I’m over collage walls? This may leave you asking, “Then what do I put on my walls?” The answer is simple - go big! Invest in oversized art. I don't care if it’s a framed family picture or an amazing wall sculpture of a hamburger. Let your art cover the wall and make a spectacular focal point in the space. Added benefit: oversized artwork can enhance an architecturally deprived space (such as the lack of fireplaces or trim work). Don't take my word for it. See for yourself how these designers have completely upleveled the space with art.
When in doubt, you can always ask an expert.
If you need design services to update your space, don't hesitate to start the process. Set up an introductory phone call today and learn how we can bring new life into your space.
If you need design services to update your space, don't hesitate to start the process. Set up an introductory phone call today and learn how we can bring new life into your space.
Check out our latest "A Few of Our Favorite Things" page. These are tried and tested items we use everyday. They make great gifts and stocking stuffers this time of year. The affiliate links below will allow you to buy them and help support our office caffeinated soda addiction.
DIY Design Packages
Are you about to start your journey into a new project and just don't know where to start? Never has it been easier to get expert design advice right from the start. Sonia Barney Design is excited to offer design packages curated for our DIY clients.
- Expert design direction at minimal cost
- Get one-on-one design advice in your home or space
- Look at all your concept images and samples and help you pull together the right look
- Measure and plan out the space in real time
- Answer any and all questions to help you to confidently implement an amazing design
Availability is limited so secure your spot today for your Designer-for-the-Day or Walk Thru Design Consultation in 2023. These make great gifts for loved ones as well this coming holiday. Click below for more details. We can't wait help you elevate your space!
Categories
All
Design Services
Holiday
Kitchen Design
Shopping Guide
Shop The Look
Style History
Trends
Archives
June 2024
December 2023
October 2023
August 2023
March 2023
January 2023
November 2022
 RSS Feed
Author
Spark your creativity and implement ideas with our SBD Studio Blog - The Spark. This is where we share with you our take on upcoming trends, favorite things, and even give you seasonal shoppable looks.* We can't wait to see how you incorporate these amazing ideas into your home. And please share your pics with us on Instagram @soniabarneydesign.
*Note that we do provide affiliate and sponsored links from which we can make extra money. Income we earn from your purchases will never increase the cost to you, but does support our caffeine addictions! Remember, a well caffeinated designer is a happy designer who in turn loves to give you more helpful tips and tricks.
|
|
Email [email protected]
Phone 208.346.1074
|